With increased online activity, internet users are now more prone to cyber crimes. To ensure one’s digital safety, it’s important that people invest some time to secure their online presence in order to avoid prospective threats of cyber criminals.
To help you with your online security, here’s a step by step guide to steer clear of getting harmed on cyberspace.

The first step towards protecting your presence online and offline is to protect your devices with passwords. These passwords should be long, complex, and strong enough that even your best friend can’t guess them (of course I don’t want her to see all the photos and read all the messages in my phone). The passwords should not just be limited to your PC, laptop and mobile phone, but your flash drives and all the other gadgets should be protected with a strong passkey.

Always run antivirus on your devices, ideally on a daily basis. You surf the internet, click on random links, download songs you heard in a friend’s car pretty much on a daily basis. When you download material from random websites without verifying the source, there’s a high chance you’re downloading some additional files without even knowing it.
These files can harm your computer or your phone in a matter of minutes, or even seconds. Or they can alter the way you surf the web by showing unnecessary ads in your browser with every click.
Antivirus software help keep your machine safe from these bugs and malware. When you run your antivirus, it identify any unknown file or harmful file in your computer and ask you to take necessary actions to prevent any damage.
Antiviruses also create a firewall which serves as a layer between your internet connection and the website you’re accessing. So whenever a website attempts to download a harmful file on your device, this firewall blocks the file and notifies you of it.

Always backup your data you can’t afford to lose. Do it on an external hard drive or a flash drive to avoid any inconvenience (read: late night meltdown) later. And when you’re traveling, make sure you don’t keep your laptop, mobile phone and your hard drive/flash drive in one bag; you don’t want to lose all your valuables at once if somebody steals your bag.

Imagine waking up to an email notifying you that your Facebook password has been changed. You try to login to your account hastily but get an error saying incorrect password. You try recovering it thinking that is still an option, but the recovery email address has been hacked too.
You message everyone to inform them your account has been hacked but the hacker has already posted all your private photo albums on your timeline and spammed your contacts. What can go worse than this, you say? Instead, ask yourself a simple question, “How can I prevent my account from getting hacked?”
I’ll take you through some simple steps to make your online accounts more secure and hard (if not impossible) to hack.
To save yourself from such horrible misery, all you need to do is to be cautious and follow a few really simple steps which experts say will make your online presence secure.

Secure your password:
A combination of different characters is all one needs to get into someone else’s account. Passwords work like a key to all your personal and professional data on the internet. Your passwords in the wrong hands can be disastrous for you, online and offline.
A strong password should:
– Have at least 13 characters with a combination of alphabets, numbers and symbols.
– Not be a dictionary word that is easily guessed or cracked
– Not have easy-to-guess personal information such as important dates, names of best
friends, pets, favorite TV shows or phone numbers or anything of that sort
– Not be left written on any document that can be accessible to anyone
Secure your account(s):
There’s more to securing your account than just the password. Just like you put multiple locks on your doors to secure your house, you need to have more than one line of control for your accounts as well. For that, Google, Facebook and Twitter offer the two-step authentication process that prevents unauthorized access to your accounts.

Google: 2-Step Verification
Google, just like Facebook and Twitter, offers an additional layer of security where it lets you assign a phone number to your accounts. What it does is it sends you a unique verification code on your mobile phone (app and/or SMS) whenever you or someone else attempts to login to your account. So even if somebody gets a hold of your password, he/she won’t be able to login without the one-time-use code that’s sent on your phone.
Google has its own app for this, called Google Authenticator. Run through the following simple steps to set up the two-step verification on your Google accounts.
Step 1:
From your desktop browser, go to https://myaccount.google.com/security > Signing in to Google > 2-step Verification

Step 2:
Click on ‘Start Setup’ and enter your phone number in the field given like:


After you enter the number, click ‘Send code’. You should now receive a 6-digit code on the mobile number you provided. It typically takes up to a minute to receive the code.
Enter the code in the new window that follows.

Once you verify the number, it asks if you want to trust the computer that you’re logged in to at the moment. If you click ‘Trust this computer’, it saves the computer ID in your account for future reference and doesn’t ask you to enter the code every time you log in, only at decided intervals.
The safe and recommended option is to select ‘Don’t trust this computer’. That way, you’ll have to enter the verification code each time you sign in to any device, ensuring only you have access.
Now that your mobile number is verified, you are taken to a new window where you can see your provided phone number. This means every time when you sign in to this Google account, you’ll be asked to enter the code that has been sent to you via SMS on your phone.
Moving on, you can switch the two-step verification process from SMS to Google Authenticator. It’s important to do this when you’re likely to be traveling and don’t have access to your local/assigned number. It also comes in handy in case the government shuts down cellular networks.
To switch to the Google Authenticator mobile app, you should click the button on your browser that says ‘Switch to mobile app’. Upon clicking that button, you’ll get this window:
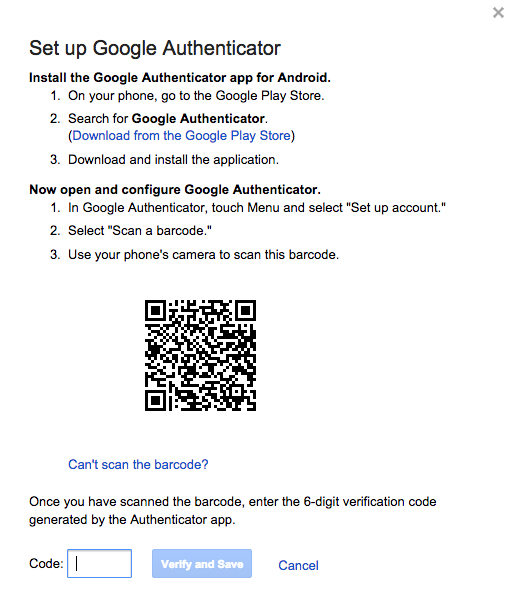
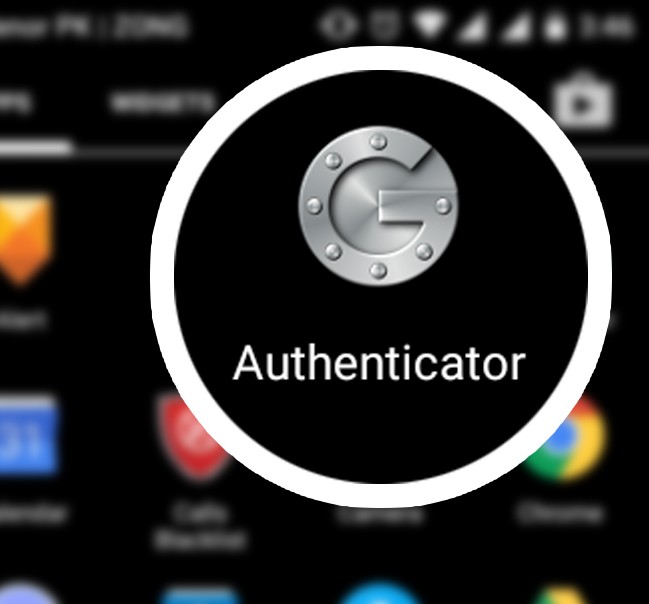
This is when you have to download Google Authenticator app from Play Store or App Store on your mobile phone.

Step 3:
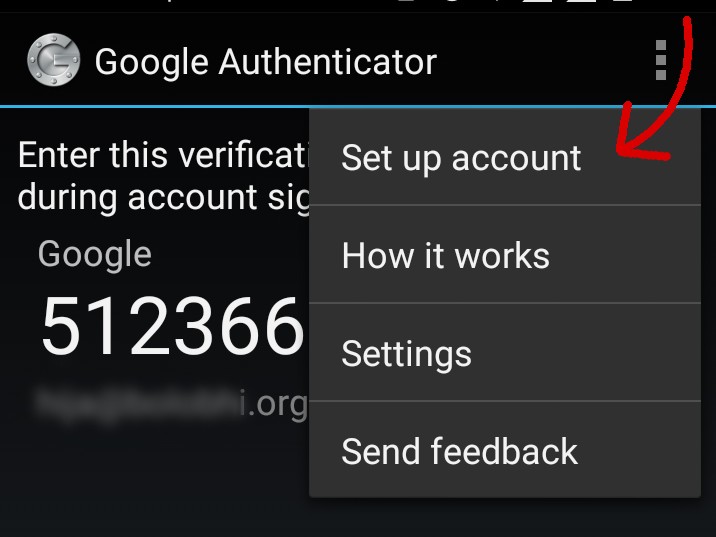
Go to settings (three dots at the top right corner of the app screen). Click on ‘Set-up account’.

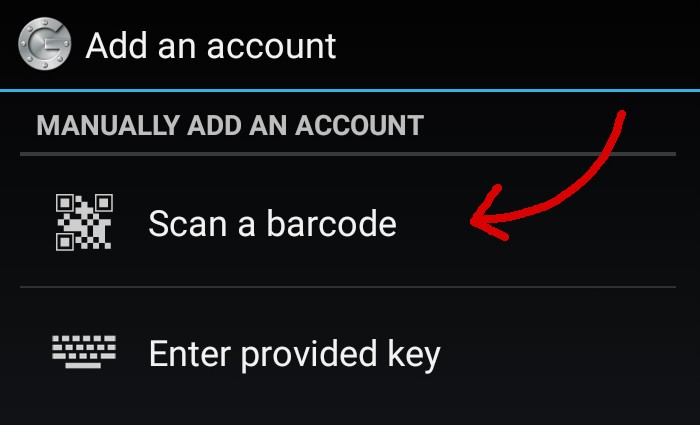
It should take you to a new window that says ‘Add an account’. There,select option ‘scan a bar code’.

Now go to your desktop browser and scan the bar code you see on the window:


This will verify your Google Authenticator app on the phone, and to verify it on the browser, enter the 6-digit code that you see on the app.
You’re now good to go.
Facebook: Login approvals
Just like Google, Facebook supports Two Factor Authentication in a fairly simple way. Two set up the feature:
Step 1:
Click on the arrow at the top right corner of the window (where you go to logout of the account)


Step 2:
Go to Settings


Step 3:
In Settings, you should see the option of ‘Security’ in the column on the left of the window:


Step 4:
Once you are in the Security tab, click on the ‘Edit’ button next to ‘Login Approvals’


Step 5:
Click on the check box that says ‘Require a security code to access my account from unknown browsers’


Click ‘Get Started’:
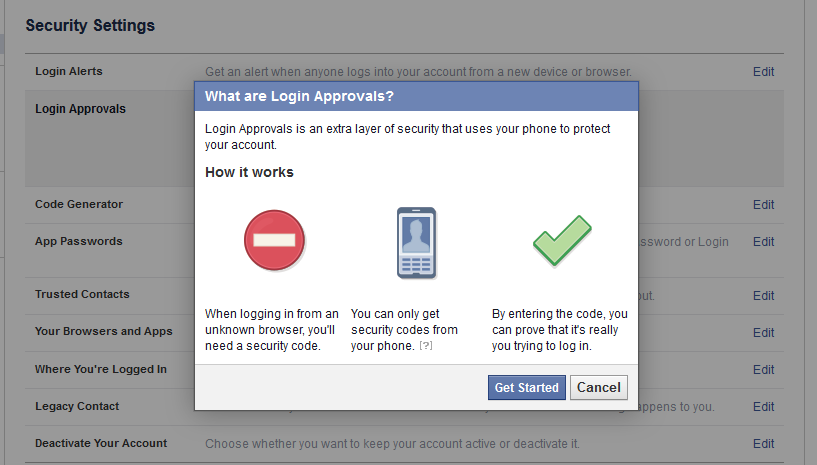

Click Continue:
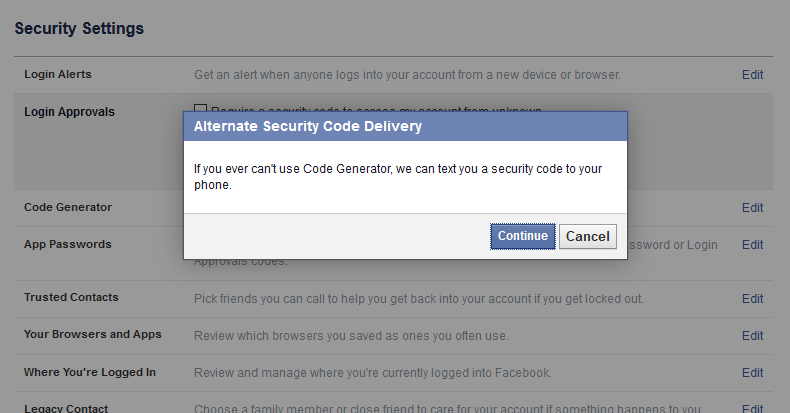

Step 6:
Enter the 6-digit code that you will receive on the mobile number you have provided, here:


Click Continue. The next screen should say:


Check ‘No thanks, require a code right away’ and click Close.
You have now enabled login verification settings on your Facebook account.
Twitter: Login verification
There have been many incidents in which hackers have attacked celebrity twitter accounts and posted tweets in their names. Clearly, those measly 140 characters are more powerful than we think they are. Setting up login verification for Twitter is even easier than Facebook and Gmail. To do this, follow these steps:
Step 1:
Click on the thumbnail of your avatar at the top right corner of the window and go to ‘Settings’


Step 2:
In settings, go to ‘Security and Privacy’ from the column on the left underneath your avatar and Twitter handle
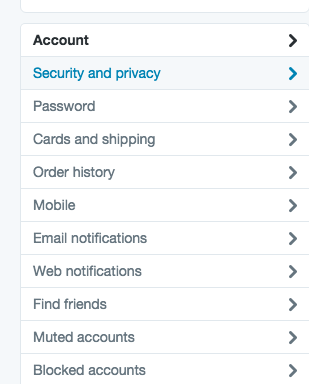

Step 3:
Once you have Security and Privacy open, the window should have the option of ‘Login Verification’:


Check the box next to ‘Verify login requests’
Step 4:
Add your mobile number in the window that follows:


Step 5:
You should receive a text message with 6-digit code to enter in the next window:


Step 6:
Click ‘Activate phone’ button.


And you are good to go!


What happens if you are traveling and don’t have the registered phone number working in another country? You won’t be able to access your own account.
For that very purpose, all the websites that support two-step verification let you download backup codes which you can save in your flash drive in case you lose access to your phone. But be sure that you don’t lose that drive.
Backup codes for Gmail:
In case you have the two-step verification process turned on your phone (where you get the code as SMS), go to the settings of your Gmail account.


Under Privacy, look for Sign-in and security’


From here, go to ‘Signing in to Google’. The window that opens should have a section that says:


Click ‘2-Step Verification’. When you scroll down, there’s a section of ‘Backup Codes’. There, click on the button that says ‘Print or download’ and the codes will be downloaded in your laptop. We suggest not leaving this file in your computer. Instead, copy it in your flash drive and delete it from the computer.
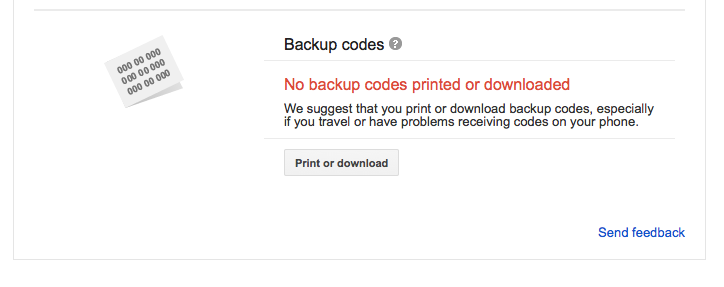

Backup codes for Facebook:
Facebook lets you download backup codes as well, just in case you don’t have access to your phone at some point.
To do this, go to your ‘Settings’
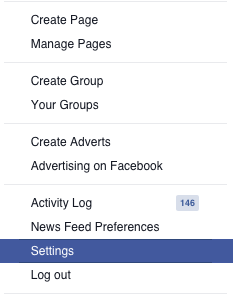

Under Login Approvals, click on ‘Get Codes’


A new message will pop where it asks for your password


Enter your password here, and the next window should give you the backup code:


When you click on ‘Get Backup Code’, it will give you a combination of 12 characters as your backup code.
Save it, copy it to a flash drive, and delete it from the computer.
Backup codes for Twitter:
To download the backup codes for Twitter, go to Settings > Security and Privacy > Login Verification.


Save it, copy it to flash drive, delete from the computer.


Once you lose access to your account for whatever reason, you can gain access to it again by providing the information you entered when you first signed up for the account. So it’s important that you remember all the initial information used to set up your account and any changes that you make. This information can be your recovery email address, your date of birth, your approximate date of sign up, your frequently emailed contacts, the tags that you might have made yourself in your account, and your previous password.
Google/Gmail:
Hackers are always in search of people whose accounts are vulnerable to what we call a cyber attack. They hack the account and either ask your friends and family for money while impersonating you, or they ask you for money if you want your account back. But you can save yourself from theft by just remembering the little details of your account, such as:
- – Your recovery email address
- – Your date of birth
- – Your secret question and its answer
- – Your frequently emailed contacts
- – The tags that you made in your mailbox (The tags other than inbox, outbox, sent,
starred, etc) - – The approximate date of sign up
- – Your previous password
There’s a high chance that you’ll be asked to enter most of this information during the process of recovering the account. In case your account has been compromised, upon notifying Google, your account will be locked until you recover it by entering the correct information.
Facebook:
Facebook lets you recover your password in case you still have access to your primary email address for Facebook (the one you login to Facebook with) by clicking on Forgot Your Password, which is right underneath the password field.
You’ll then be asked to enter your email address on the next page. Once you hit enter, you should see this page:


Facebook will ask you to either use your primary email account (the email you use to log in to your account) or have a link emailed to your affiliated account. Using your email account (in case of this screenshot, it’s a Gmail account) means that you directly log in to your email through a pop-up window, whereas for a reset link, you’d need to access your email and click the link which Facebook sends you.
In case you don’t have access to your primary email address anymore, click ‘No longer have access to these?’ to go to the new page where it lets you enter a new phone number or email address:
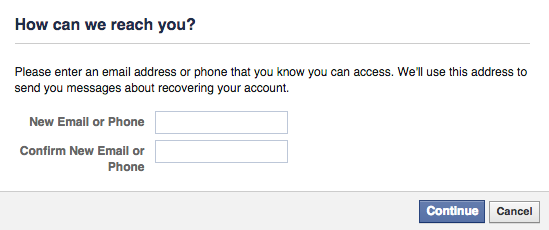

By providing an alternate email address or phone number, you submit an application to Facebook upon which Facebook asks you to provide any sort of legal document (CNIC or passport copy) to prove that the account is really yours.
After reviewing the application, Facebook contacts you on the email address or phone number provided to reset your password in case your application is accepted. Otherwise you’ll be asked to provide more information to recover the account.
Twitter:
In case you lose access to your twitter account, you can recover the account by following these simple steps:
- – Click ‘Forgot Password’
- – It’ll take you to the page where you’ll be asked to enter either your email address or
phone number or username - – Upon entering, you’ll see this page:


Enter your email address or phone number for verification. Once you’re done, you’ll be taken to this page:


This asks you to choose where Twitter will send the reset link, either on your phone or on your email address.


What happens if you lose your account access and not have two-step verification switched on?
In this case, you have to notify the website about the hacking by clicking on the ‘Forgot your password’ option. It’ll ask you for your email address (the one that you have lost access to) followed with a form to fill in to help them get as much information as possible about your account and for identifying that you own the account. This is to prevent anyone else gaining access to your account.
Gmail
To recover password for Google, after clicking ‘Forgot Password’, you’ll be required to enter your last remembered password, and an alternate email address where you’ll be contacted by Gmail to recover your account.
On the next page, you’ll be asked to enter few details of your account like the last time you logged in to it, and the date you created your account. Once entered, you’ll receive an email on the alternate email address that you provided. Follow the instructions in that email and you’ll be able to recover your account.
Facebook
In case you have lost access to your Facebook account, it requires you to send a proof of identification (CNIC, passport or any documents) to recover the account. This is due to Facebook’s real name policy, according to which you can only set up an account using your real name.
In case you don’t make it in your real name and end up losing access to the account, you won’t be able to recover it.
As Facebook states it on their password recovery form webpage:


Unlike Facebook, Twitter doesn’t require any document when you submit an application to recover your password. They ask you to enter your username to identify your account, and then the email address or phone number where you’d like to be contacted by Twitter to assist them in recovering your account. According to Twitter, it takes a few days for them to recover an account if the person reporting cooperates with the team.


- – It’s important to change your passwords at least every six months
- – Your passwords should not be the same for every account
- – Use a combination of at least 13 complex characters as your password
- – Never write your password on a paper or any sort of document
- – It’s not a good idea to share passwords with anyone
- – Always remember your secret question and other important information of your
account. It helps you in recovering your account’s password in case you lose access to it for
any reason - – Always restrict the privacy of your photos, videos and posts on social media websites to
your friends or choose even more limited settings - – It’s not advisable to add unknown people or someone you don’t meet frequently, on your
social media profiles - – Spend time in understanding the default settings of the social media sites
- – Always make sure that the website is protected with ‘https://’ protocol. HTTPS secures
the connection of the host website to the receiver - – Always delete your browser history
- – Always use the private mode of the browser
- – Invest time in going through the settings of your browser
- – Lock your phone with a passkey and not a pattern. It’s easy to see the pattern by
someone else when you’re entering it - – Create a backup of your phone contacts in more than one place
- – Avoid keeping personal photos in your phone
- – When downloading any app from the app store, always read the permissions that app is
asking to access on your phone before installing - – Install an antivirus software in your phone and regularly run in
- – Don’t install apps from unknown third parties
- – Don’t put too much private information anywhere on the internet


Nothing is ever absolutely private on the internet. Post wisely.


What’s up to every body, it’s my first go to see of this webpage;
this website contains awesome and genuinely good material in favor of
readers.
Do you have advice for us, so we can become a reliable writer.
Hopefully in the future you post how to write good and right,
even more! Indeed, writing articles is one
of the strengths in creating a website. So, a webmaster must have a lot of knowledge to make
the website more advanced and have a ranking. Even though you have already discussed
some important points, discussions in comments are also needed,
thank you for providing us with a comment tab.}